Sunday, May 31, 2009

Programmatically change Web project settings from dynamic port to static

If you have a solution consisting of many Web applications that currently use dynamic ports for debugging and now you want to modify them to be static, it will be tedious and extremely time-consuming to go in each project and change it. I developed an application to resolve this. For the future sake, I create a custom project template so that I don't have to go in the project properties and change it whenever a new Web application is created. Indeed, with my own project template, I can customize other things like libraries, references and macros I always use in a project.

Currently the application supports VS.2008. It takes the solution file (.sln) as an input to locate the project locations, and then goes in each indiviual project file (e.g., .csproj and .vbproj) to alter the setting. It only targets Web application including WCF. but not Website because the Web project properties for a Website is stored in .sln file.

The idea behind this application is very simple.

Define the settings

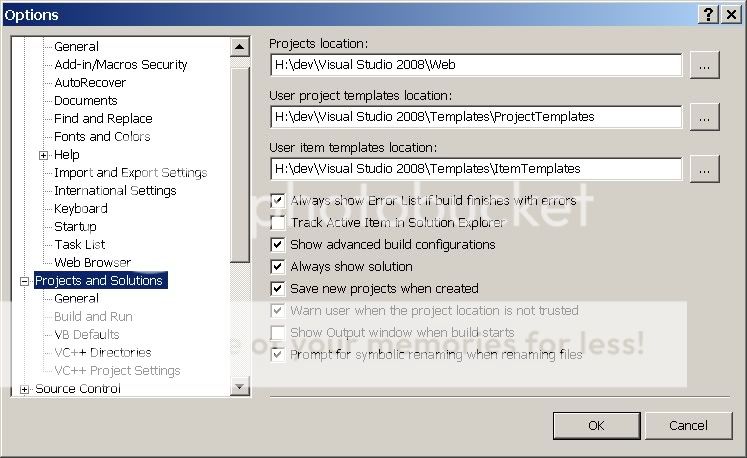
First, I create a setting file called vs.xml.   Currently the port is default to 2332.   The text in light green background is similar to the text you may find in your Web project file.

<?xml version="1.0" encoding="utf-8" ?>
<VisualStudio target="Visual Studio 2008 ">
  <SolutionFile version="10.00" desc="Microsoft Visual Studio Solution File, Format Version">
    <Languages>
      <Langauge enabled="true">
        <Type>CSharp</Type>
        <GUID>{FAE04EC0-301F-11d3-BF4B-00C04F79EFBC}</GUID>
        <extension>.csproj</extension>
      </Langauge>
      <Lanaguage enabled="true">
        <Type>VisualBasic</Type>
        <GUID>{F184B08F-C81C-45f6-A57F-5ABD9991F28F}</GUID>
        <extension>.vbproj</extension>
      </Lanaguage>
    </Languages>
  </SolutionFile>
  <ProjectFile desc="Microsoft Visual Studio Project File">
    <Web> 

<!-- Begin Settings --> <ProjectExtensions> <VisualStudio> <FlavorProperties GUID="{349c5851-65df-11da-9384-00065b846f21}"> <!-- Define Web Project Settings --> <WebProjectProperties> <UseIIS>False</UseIIS> <AutoAssignPort>False</AutoAssignPort> <DevelopmentServerPort>2332</DevelopmentServerPort> <DevelopmentServerVPath>/</DevelopmentServerVPath> <IISUrl> </IISUrl> <NTLMAuthentication>False</NTLMAuthentication> <UseCustomServer>False</UseCustomServer> <CustomServerUrl> </CustomServerUrl> <SaveServerSettingsInUserFile>False</SaveServerSettingsInUserFile> </WebProjectProperties> <!-- End of Web Project Settings --> </FlavorProperties> </VisualStudio> </ProjectExtensions> <!-- End of Settings -->

</Web> </ProjectFile> </VisualStudio>

The above vs.xml can be altered to support VS.2005. But I am going to describe the details here.

Define data structure to contain the settings

Create a data structure to contain all the Web properties; they are:

KeyValue
UseIISFalse
AutoAssignPortFalse
DevelopmentServerPort2332
DevelopmentServerVPath/
IISUrl
NTLMAuthenticationFalse
UseCustomServerFalse
CustomServerUrl
SaveServerSettingsInUserFile

I use a Dictionary to capture this.

    private Dictionary<String, String> props;
When the application reads vs.xml, it will automatically load all the settings into this props Dictionary.

Function to alter the settings

The function SaveTo as shown below will update the settings into the project file based on the settings in props.   Note that my current version is slightly different now.

    /// <summary>
    /// Saves the settings to a specific file.  
    /// The project file must have ProjectExtensions/VisualStudio/FlavorProperties/WebProjectProperties
    /// nodes in order to be qualified for process.
    /// If the required elements under WebProjectProeperties node are missing from the specific document, 
    /// it will insert them.  
    /// The original elments in the document under that node remain intact if they don't match.
    /// </summary>
    /// <param name="fileName">the exact full filename of the project file for save</param>
    public void SaveTo(String fileName) {
      String namespaceUri = null, prefix = null;
      bool hasNamespace = this.HasNamespace(fileName, out namespaceUri, out prefix);

      XmlDocument xmlDoc = new XmlDocument();
      xmlDoc.Load(fileName);
 
      XPathNavigator navigator = xmlDoc.CreateNavigator();
      XmlNamespaceManager namespaceManager = new XmlNamespaceManager(navigator.NameTable);
      if (hasNamespace) {
        SetupNamespaceEnv(prefix);
        namespaceManager.AddNamespace(prefix, namespaceUri);
      }

      XPathNavigator result = null;

      if (navigator.HasChildren) 
        result = navigator.SelectSingleNode(GetTargetNodeXPathExpression(), namespaceManager);
      else 
        throw new XmlException("Invalid file format, or it is not a Web project file.");

      if (result == null)
        throw new XmlException("It is not a Web project file.");
      

// up to here, "result" should be at node "WebProjectProperties" Dictionary dup = this.CloneProperties(); if (result.MoveToFirstChild()) { do { result.SetValue(dup[result.Name]); dup.Remove(result.Name); } while (result.MoveToNext()); this.changed = false; // all properties updated. if (dup.Count > 0) { // Missing properties we need to save, do INSERT to file now...; result.MoveToParent(); // position back to "WebProjectProperties" node this.AppendChild(ref result, dup); } } else { // no child found at "WebProjectProperties" node this.AppendChild(ref result, dup); // add a child nod with all the needy settings } xmlDoc.Save(fileName); // Now is time to save to disk.

if (hasNamespace) { this.ReverseNamespaceEnv(); } }

The main purpose of this function does is to update the project settings:
  • First, it locates the <WebProjectProperties> node to begin the process.
      <ProjectExtensions>
        <VisualStudio>
          <FlavorProperties GUID="{349c5851-65df-11da-9384-00065b846f21}">            
            <WebProjectProperties>
            ...
            </WebProjectProperties>
          </FlavorProperties>
        </VisualStudio>
      </ProjectExtensions>
    
  • When the node is found, the function will temper the settings accordingly. All settings are stored inside the <WebProjectProperties> node. However,
    • If there is empty inside the <WebProjectProperties> node, all settings will be appended into it.
    • According to props, any missing setting(s) will be added accordingly.
    • Any extra settings cannot be found in props will remain intact.

Describe basic project file structure in Solution (.sln)

If you use a text editor to open .sln file and view it, you will find that each project may contain the following structure.

 Project("language_GUID") = "project_name", "project_location_or_file", "project_GUID"
   ProjectSection(...) = ...
   ...
   EndProjectSection
 EndProrject
A regular Windows or Web project will not contain ProjectSection. But if a Web project is type of Website, ProjectSection is used for storing WebsiteProperties because it doesn't own a project file. A WCF client may use WebsiteProperties for its ProjectDependencies. In sum, most projects only contain two lines: The first Project line and the EndProrject line. For example,
Project("{FAE04EC0-301F-11D3-BF4B-00C04F79EFBC}") = "MyTest", "Test\MyTest.csproj", "{7C0275FE-A91D-42E9-9EF1-5CCBC9D54C3C}"
EndProrject

Put everything together

All project locations registered with the solution are relative to the solution. Thus the location Test\MyTest.csproj in the above example is a relative path to its solution. As soon as the project location is found, convert it to the absolute path and then feed it to the function SaveTo, SaveTo will update the settings automatically.

In order to accomplish this, I create a Collection to contain all the project data found in the solution file.

    private Collection<ProjectIdentifier> projectCollection;
Each project data is defined in the following class:
  public class ProjectIdentifier {
    private String langGuid = null;
    private String name = null;
    private String location = null;
    private String guid = null;

    public ProjectIdentifier(String langGuid, String name, String location, String guid) {
      this.langGuid = langGuid;
      this.name = name;
      this.location = location;
      this.guid = guid;
    } 
    ...
  }

When everything is ready, loop through the projectCollection to update the project files:

  foreach (ProjectIdentifier project in c) {
    ...
    if (System.IO.File.Exists(project.Location)) {
      try {            
        ...
        if (project.IsWebProject()) {
         ...
            this.Backup(project.Location, this.txtTag.Text.Trim());

          propsBuilder.SaveTo(project.Location);
        ...
      }
      catch (Exception ex) {
        String err = String.Format("Error occurs: {0}{1}{2}",
                                   ex.Message, Environment.NewLine, ex.StackTrace);
        ...
      }
    }
    else { // file not found or is not a file.
      ...
    }
  } // foreach

Request my application

Before execution, my application will first back up the project file by default while it traverses the project folder. You can override this setting if you don't like it. The backup files can be programmatically removed in a later time when you feel comfortable with the changes. I don't know how useful for you but it certainly helps me to resolve a lot of tedious tasks.   Please feel free to leave me a message via the comment box for requesting this application if you think that it will be helpful to your issue.   Don't forget to leave your email for response. All application requests will NOT be left on comment.

Update August 6, 2009
On or off there are people requesting it. Here are the links where I put for storage so I am no longer to manage and distribute them myself. Please feel free to download it yourself. The code has been changed since this post.
Download: [ Source ] [ Binary ]

Note that: if you request it, then you use it as your own risk. I am not responsible for any damages that may occur.

Update July 15, 2011
Sorry, this application is no longer to download. It is hard for me to ensure that the files are still alive.

Additional notes for exporting project template


Template Directory Setting

The default location on XP for VS.2008 for template storage is at
      %USERPROFILE%\My Documents\Visual Studio 2008\Templates

You can change this setting at the VS.2008 menu bar: Tools --> Options.
Projects and Solutions

Export Template and Location

Create a blank project, edit it, import and reference your vital libraries.  When you're done, go File menu to choose Export Template.... Follow the wizard to complete the rest.

A project template is always exported to the default output folder where you cannot change:
      %USERPROFILE%\My Documents\Visual Studio 2008\My Exported Templates

The location you set at Projects and Solutions is primarily for the IDE to locate and load your custom templates.

If you accept the default setting Automatically import the template into Visual Studio when you export the template, IDE will automatically save a copy under that template folder where Projects and Solutions specifies.

Additional Template Folders

Project Templates Location
For the first time project template creation, three (3) additional folders will be automatically created for your template organization:
  • Visual Basic
  • Visual C#
  • Visual Web Developer
And your template file will stay with them at the same directory level. In my example, it is MyC#WebApplication.zip.

I won't bother to put the template into one of those folders. You can drag the zip file into them if you want to organize it. As long as the template is under the template folder, the IDE is smart enough to loop through its sub-folders and find your template.

Edit Template Project Description

If you want to display a descriptive name on the IDE, go to the designated project templates folder and then do the editing. In my case, it is locate at H:\dev\Visual Studio 2008\Templates\ProjectTemplates.
  • Extract MyTemplate.vstemplate from the zip file and then open it for edit.
  • Locate <Name> and give descriptive name, e.g., My ASP.NET Web Application in C#
    <VSTemplate Version="2.0.0" xmlns="http://schemas.microsoft.com/developer/vstemplate/2005" Type="Project">
      <TemplateData>
        <Name>My ASP.NET Web Application in C#</Name>
        <Description>A C# Web Application with a specific port (.NET Framework 3.5)</Description>
        <ProjectType>CSharp</ProjectType>
        ...
    
  • Save it and then zip it back to the original zip file.
Now try to add a new project, you will see the new template shown under My Templates. Add New Template

Wednesday, May 27, 2009

Problem of copying big file within a VM from the host

Have you ever experienced the following error?

Cannot copy <file_name>: The specified network name is no longer available.

Regardless of which Microsoft Windows, this problem occurs whenever you use Bridged mode on VMware network. Everything works fine with Host-only or NAT.

On VMware Server 1, I can disable the automatic bridging and then reconfigure other virtual adapter (not vmnet1 or vmnet8) as Bridged network by binding it to a physical adapter. This problem will go away. But this technique doesn't work for VMware Server 2. Thus, the problem still remains unresolved. What I can do is to copy files within the host to the VM, instead of inside the VM and do copying.

I don't believe that this post is correct. VMnet1 is Host-only. Indeed, I am not sure how we can change the nature of vmnet1 and vmnet8 to Bridged. Since the author of that post was using Host-only on vmnet1, certainly copying big file problem would not be an issue.

The other thing I would like to mention is that any newly added virtual adapter is always Host-only if the VMware Server is running on Windows. I am not sure if it holds true for other platforms.

Monday, May 25, 2009

Bridged vs Host-only vs NAT

I have been using VMware since 2002. I mostly use it for my development testing. There was no free version from VMware at that time. Luckily I got exposed to both WorkStation and GSX at work. Now I can have my free virtual server installed at home. All my VMware servers are running on Microsoft platform. I have both VMware Server 1 and 2 running on different machines. I like VMware Server 1 more than Server 2 because of its simple interface (which is VMware Server Console), a bit light weight to me and no restart needed when a configuration is changed.

Most my friends are confused by the 3 different modes network setting: Bridged, Host-only and NAT. Like most people, they use the default setting, Bridged. In the following, I am going to briefly distinguish the difference among these 3 network modes. I would also point out some issues existing in each mode, from a user point of view. Those issues applies to the free versions both VMware Server 1 and 2 running on Microsoft Windows platforms. For detail of how these 3 modes work or are configured, please consult VMware documentation ( Server 1 [Install, Manual] | Server 2 User Guide ).

Each VMware network mode is associated with a named virtual adapter. You can add and remove any virtual adapter you want. On Windows, the newly added virtual adapter is only bound to Host-only network. It may not be the case if you are running the server on other platforms but I don't know. In addition, you can configure a custom adapter to assoicate with each physical network adapter to fit your need.

These three basic VMware network are listed as follows.

Mode Virtual Adapter
Bridged : vmnet0 this is the default.
Host-only : vmnet1
NAT : vmnet8

Note that the issues listed in the following table are only applied to Microsoft Windows. I am not sure if they hold true for other platforms.

Bridged (vmnet0)

Communication and Visibility: The virtual machine (VM) acts as if a regular PC ran on the same physical network. You can go Internet and do whatever you want unless your software is hardware dependent. All VMs on vmnet0 are visible to others on the same physical network and vice versa.

Performance: In my experience, the VMware Bridged network is kind of slow. On Microsoft Windows, it is much slower on a workgroup network, compared to a domain.

DHCP or Additional Service: No DHCP service is provided. If you don't have a router or DHCP server running on your network, this mode may not suit for you. In this case, you should consider either Host-only or NAT network depending on if you want Internet access.

Issues:

  • Big File Copy: Regardless of VMware Server 1 or 2, the file copying from the host inside a VM will fail when the file size is large enough. While the file is being copied from the network, the following error may occur: "Cannot copy <file_name>: The specified network name is no longer available." (Also see this)
  • Leaking IPs to physical network: The VM's IP is assigned by the physical network (e.g. your router or DHCP server). Thus, this problem doesn't apply here.

Host-only (vmnet1)

Communication and Visibility:The network communication of this mode is limited between the host and the VMs on the same vmnet1 adapter. Those VMs cannot make a connection beyond the host; thus there is no internet access capability. They remain hidden behind the host. You cannot configure it to expose any VM on vmnet1 to the physical network either.

Performance: The performance of Host-only (or vmnet1) is very fast. I usually use this setting for software testing especially when I don't need an Internet access. For example, I could run a database server inside a VM for a simple test.

DHCP or Additional Service: This mode provides DHCP sevice. If you don't have a router or a DHCP sever running on your network, this one comes in handy. This service can be disabled.

Issues:

  • Big File Copy: Unlike Bridged, I don't experience any file copy problem regardless of size (also see this).
  • Leaking IPs to physical network: VWware DHCP may assign IPs to the PCs on the physical network and cause problems. I encounter this problem when I have my VM Server running first and then my other physical PC joins the physical network later.

NAT (vmnet8)

Communication and Visibility: All VMs using the adapter vmnet8 form a private network with the host. They all have internet access capability, but they are not visible to others beyond the host as if they are sitting behind their own firewall with the host. You can expose the VM for a particular access by port forwarding via NAT configuration provided by the VMware network utility (in the desktop Start menu: VMware -> VMware Server -> Manage Virtual Networks).

Because of its internet capability, I use it often for Web application testing and development too.

Performance: To me, it is faster than Bridged and could be as fast as Host-only.

DHCP or Additional Service: This mode provides DHCP sevice. If you don't have a router or a DHCP sever running on your network, this one comes in handy. This mode also provides NAT service for further network configuration. Both services can be disabled.

Issues:

  • Big File Copy: Unlike Bridged, I don't experience any file copy problem regardless of size (also see this).
  • Leaking IPs to physical network: VWware DHCP may assign IPs to the PCs on the physical network and cause problems. I encounter this problem when I have my VM Server running first and then my other physical PC joins the physical network later.

Disabling VMware DHCP and NAT on Windows

If you are only using Bridged network, I would recommend to have both VMware DHCP and NAT services disabled. They are not used by Bridged.
On Windows, you can disable it via your Services console (services.msc) from Administrative Tools. These two services on Windows are called VMnetDHCP (for VMware DHCP Service) and VMWare NAT Nervice respectively.
  • Locate the service you want to disable.
  • Right click to select Properties.
  • From the Startup type dropdown box, select Disabled.
  • Click OK button.

Or run the following commands at the command prompt.
   sc config "VMnetDHCP" start= disabled 
   sc config "VMware NAT Service" start= disabled
Note that
  • start= must be in one single word.
  • There must be a space between the equal sign (=) and the word disabled.

Sunday, May 24, 2009

Apache ignores DocumentRoot in VirtualHost

Lasts night I got stuck in configuring a virtual host on Apache 2.2. Regardless of which port I set (including the port 80), the Apache server ignored my DocumentRoot setting for the virtual host. Until I read this post, it reminded me to check all wildcard settings. The problem I had was slightly different from the one in the post.

In that post, the problem was from the wildcard setting on the ServerName. For me, I was missing a port number next to the wildcard when I was setting it at the VirtualHost directive for localhost. Everything works fine after the port number had been added.

Please don't make the same mistake as I did. Even you are using port 80, you should always put the port number next to it. Otherwise, your virtual DocumentRoot will NOT be recognized.

The followings are my virtual host settings in httpd-vhost.conf.

Incorrect Correct
NameVirtualHost *:9090

# Missing port number to localhost or the default site
<VirtualHost *>
  DocumentRoot "C:\servers\Apache Software Foundation\Apache2.2\htdocs"
  ServerName localhost
</VirtualHost>

<Directory "h:/vhosts">
  Order Deny,Allow
  Allow from all
  Options Indexes FollowSymLinks
</Directory>

<VirtualHost *:9090>
   # Note: no wildcard supported in ServerName
   ServerName examples.local
   ErrorLog "logs/examples.local-error.log"
   CustomLog "logs/examples.local-access.log" common
   DocumentRoot "h:/vhosts/examples"
</virtualHost>
NameVirtualHost *:9090

# Port number is given to the localhost or the default site
<VirtualHost *:9090>
  DocumentRoot "C:\servers\Apache Software Foundation\Apache2.2\htdocs"
  ServerName localhost
</VirtualHost>

<Directory "h:/vhosts">
  Order Deny,Allow
  Allow from all
  Options Indexes FollowSymLinks
</Directory>

<VirtualHost *:9090>
  # Note: no wildcard supported in ServerName
  ServerName examples.local
  ErrorLog "logs/examples.local-error.log"
  CustomLog "logs/examples.local-access.log" common
  DocumentRoot "h:/vhosts/examples"
</virtualHost>

Tuesday, May 19, 2009

SOAP and REST-based WCF basic settings in Web.config

This only serves my own notes because I always forget it when I switch one type of Web service to another.
SOAPREST
<system.serviceModel>
   <services>
     <service
            behaviorConfiguration="ServiceBehavior">
       <endpoint
                address=""
                binding="wsHttpBinding"
                contract=...>
       ...
       </endpoint>
       ...
     </service>
   </services>
...
</system.serviceModel>
<system.serviceModel>
   <services>
     <service
            behaviorConfiguration="ServiceBehavior">
       <endpoint
              address=""
              binding="webHttpBinding"
              behaviorConfiguration="RESTBehavior"
              contract=...>
       ...
       </endpoint>
       ...
     </service>
  </services>
  ...
  <behaviors>
    ...
     <endpointBehaviors>
         <behavior name="RESTBehavior">
             <webHttp/>
             ...
       </behavior>
     </endpointBehaviors>
  </behaviors>
  ...
</system.serviceModel>

Friday, May 15, 2009

Blogger cannot display the image

Please wait, loaing rat_cheese.gif...
Using the images stored with blogger could be tricky. There is no doubt that the image can be displayed correctly if you use exactly the code provided by blogger.
<a onblur="try {parent.deselectBloggerImageGracefully();} catch(e) {}"
     href="https://blogger.googleusercontent.com/img/b/R29vZ2xl/AVvXsEh0dTd1RVdaar9KTLCks9J022j3MxwYgjx7fIjXCTaj1COwHcxCAEge4DKoFhoFNuFs9mGxkc4yXFby9JiZbzIuwBFSe9Qb9vKkgqZxrUR-gZdcFhksqi4IlVW8UZylPZAcge3Dw2UlaTM/s1600-h/rat_cheese.gif">
     <img style="display:block; margin:0px auto 10px; text-align:center;cursor:pointer; cursor:hand;width: 230px; height: 320px;"
       src="https://blogger.googleusercontent.com/img/b/R29vZ2xl/AVvXsEh0dTd1RVdaar9KTLCks9J022j3MxwYgjx7fIjXCTaj1COwHcxCAEge4DKoFhoFNuFs9mGxkc4yXFby9JiZbzIuwBFSe9Qb9vKkgqZxrUR-gZdcFhksqi4IlVW8UZylPZAcge3Dw2UlaTM/s320/rat_cheese.gif"
       border="0" alt=""
       id="BLOGGER_PHOTO_ID_5336176003028964418" />
As you may notice in the above code, the references specified in href and src are no much difference except for one directory hierarchy:
  • href uses the image in s1600-h:     the image looks original or bigger.
  • src uses the image in s320:     the image is shrunk or smaller.
With the image specified in s320 directory, the image is displayed without a problem:
<img style="display:block; margin:0px auto 10px; text-align:center;"
     src="https://blogger.googleusercontent.com/img/b/R29vZ2xl/AVvXsEh0dTd1RVdaar9KTLCks9J022j3MxwYgjx7fIjXCTaj1COwHcxCAEge4DKoFhoFNuFs9mGxkc4yXFby9JiZbzIuwBFSe9Qb9vKkgqZxrUR-gZdcFhksqi4IlVW8UZylPZAcge3Dw2UlaTM/s320/rat_cheese.gif"
     border="0" alt="Using s320"
     id="BLOGGER_PHOTO_ID_5336176003028964418" />
With the image specified in s1600-h directory, the image cannot be displayed:
<img style="display:block; margin:0px auto 10px; text-align:center;"
     src="https://blogger.googleusercontent.com/img/b/R29vZ2xl/AVvXsEh0dTd1RVdaar9KTLCks9J022j3MxwYgjx7fIjXCTaj1COwHcxCAEge4DKoFhoFNuFs9mGxkc4yXFby9JiZbzIuwBFSe9Qb9vKkgqZxrUR-gZdcFhksqi4IlVW8UZylPZAcge3Dw2UlaTM/s1600-h/rat_cheese.gif"
     border="0" alt="Using s1600-h"
     id="BLOGGER_PHOTO_ID_5336176003028964418" />
In order to reference the bigger image, you have to use the undocumented directory s1600 for image reference, not s1600-h:
<img style="display:block; margin:0px auto 10px; text-align:center;"
     src="https://blogger.googleusercontent.com/img/b/R29vZ2xl/AVvXsEh0dTd1RVdaar9KTLCks9J022j3MxwYgjx7fIjXCTaj1COwHcxCAEge4DKoFhoFNuFs9mGxkc4yXFby9JiZbzIuwBFSe9Qb9vKkgqZxrUR-gZdcFhksqi4IlVW8UZylPZAcge3Dw2UlaTM/s1600/rat_cheese.gif"
     border="0" alt="Using s1600"
     id="BLOGGER_PHOTO_ID_5336176003028964418" />

Sunday, May 3, 2009

LINQ and ConnectionString

There are some issues you should know when you are working with Database Markup Language(DBML) or generating LINQ to SQL classes in VS.2008 IDE:

Why is the dropdown box of "Choose your context object" always empty or why can't I find my context object while I am configuring LinqDataSource?

Why do I have this error "No parameterless constructor defined for this object"?

Why does the actual connection string suddenly appear inside the parameterless contructor of my DataContext class?

Why can't I add a database table to DBML / LINQ designer?


  1. Why is the dropdown box of "Choose your context object" always empty or why can't I find my context object while I am configuring LinqDataSource?

    Please be sure the DLL containing the context object existed and you have a reference to it. If the LINQ class is newly created, please compile the project first before you try to configure LinqDataSource.

  2. Why do I have this error "No parameterless constructor defined for this object"?

    If you remove the ConnectionString manually from the Connection element of the DBML source file first (use external text editor to remove it) and then set the Application Settings to False (also see How to Turn off Application Settings for LINQ), your parameterless constructor of the DataContext class (e.g., Book.designer.cs) will immediately be removed by the IDE. Then the above error will occur when you recompile and run the application.

    Normally enabling Application Settings on LINQ will have the parameterless constructor generated for you automatically, as long as its ConnectionString property is not empty. Indeed, you won't be able to remove the ConnectionString property inside the IDE.  But you remove it anyway outside it. When this happens, the original parameterless contructor will lose forever regardless of Application Settings. Thereafer, adding back the ConnectionString property to the file will not resolve it. And the other problem dicussed in the next question may occur.

    To resolve this, you need to manually add the original parameterless constructor back.

  3. Why does the actual connection string (like below) suddenly appear inside the parameterless contructor of my DataContext class? For example,
        public BookDataContext() :
            base("Data Source=.\\SQLEXPRESS;AttachDbFilename=|DataDirectory|\\Books.mdf;Integrated Security=True;User Instance=True", mappingSource)
        {
            OnCreated();
        }

    Situation 1:    If you set the Application Settings to False while the ConnectionString property exists in the DBML source file, your original parameterless constructor of that DataContext class will be altered by hard-coding with the actual connection string that can be found in your .config file (e.g., web.config).

    Situation 2:    The application had Application Settings set to False and the correct default parameterless constructor some time ago. Later, you make a change by adding a new table to the LINQ. As soon as you drag the new table to the DBML or LINQ designer, your original, correct parameterless contructor will be altered by hard-coding with the actual connection string.

    Currently, I don't know any other easy way to deal with it. If you know, please jot me a note. What I do is

    1. First, ensure Application Settings for LINQ is set to False.
    2. Then, manually alter or copy the parameterless contructor back to the original
    3. .

  4. Why can't I add a database table to DBML / LINQ designer?

    This happens when

    • your Application Settings for LINQ is set to False,
    • ConnectionString element doesn't exist in the DBML source file, and
    • the parameterless constructor in LINQ class is missing.

    The IDE needs to know where to read the connection string in order to access the database. Please ensure you have the parameterless contructor defined correctly while remaining Application Settings for LINQ to False and the absence of ConnectionString in the DBML source file.

Sample of Parameterless Constructor in a ContextClass

public BookDataContext() :     base(global::System.Configuration.ConfigurationManager.ConnectionStrings["BookConnectionString"].ConnectionString, mappingSource) {     OnCreated(); } where BookDataContext is my DataContext class, BookConnectionString is the name of the connection string found in .config file. You should change them to fit yours accordingly.

How to Turn off Application Settings for LINQ
The default setting of LINQ to SQL class is always True. You can do the following to disable it.

On VS IDE
  • Go and double-click to open the DBML file from Solution Explorer.
  • Then open the file Properties window if it is not open. Be sure that the focus is on the DBML designer tab; otherwise, you won't see or cannot continue with the next step.
  • Expand Connection and then set Application Settings to False.