Wednesday, June 12, 2024

Forcing Google Advanced Search to display in English

Google Advanced Search, by default, only shows the local language for anonymous users and there is no language selection option for change.  If you don't understand the local language, it is definitely a nightmare.

To overcome this, simply appending the language parameter on the URL will ease your mind.  For example, if you want the page (https://www.google.com/advanced_search) to display in English, simply add a question mark ( ? ) followed by hl=en parameter to the end of the URL.  Language specific can also go along with the region info, e.g.,  hl=en-us.

https://www.google.com/advanced_search?hl=en

https://www.google.com/advanced_search?hl=en-us


References:

2 Characters Language codes 

Host language (hl) Parameter


Thursday, January 25, 2024

Resolving invalid mail server certificates with Thunderbird

It has been a long time not dealing with this error and I almost forget about it.   Now it is a lot simpler to fix this than before.  There is no need to export Avast certificate and then import it back to Thunderbird.

  • Go to Thunderbird Settings and select Privacy & Security.   
  • Scroll down to locate Manage Certificates....


  • Certificate Manager window will be shown.
  • Ensure to select Authorities in the Certificate Manager window.  Then scroll to the row of Avast Web/Mail Shield, select the certificate and then choose Edit Trust....


  • Grant trust to the certificate and then click OK to exit.  In my case, I only need this: "This certificate can identify websites" since I manage my personal mailboxes.


That's.  


Wednesday, January 24, 2024

Disable Chrome Download Popup

The "Enable Download Bubble" are no longer found in the experiment features which usually can be customized in chrome://flags.  For now, it can be turned off via the settings.

Go to chrome://settings/downloads

Turn off "Show downloads when they're done" to disable the popup notification when the download is completed.  

This setting only disables the popup upon completion.  You will still see the animation signal as soon as the download has started.


Sunday, August 27, 2023

Get Rid of Quick Access Search Bar and Bing Alerts

A week ago, I opened Chrome as usual.   But the following message (Figure 1) was popped up from nowhere nearby the right bottom corner of the taskbar on my Windows 10, asking me to switch and use Microsoft Bing as my default search engine.  

Figure 1. Microsoft Bing Alert Asking to be Default Search Engine on Chrome


Under the Google Search, I have learned that this issue is somewhat related to Microsoft Edge.  I don't use Edge.  I am surprised to receive the alert (Figure 1) while there was no Edge process found in my Task Manager.   Then, I opened Edge (edge://flags/) and disabled the experiment flag (i.e., Show feature and workflow recommendations) as recommended (Figure 2).

Figure 2.  Disable Recommendations from Microsoft Edge

When I exited Edge, I didn't expect that there was a Quick Access Search Bar right in front of my desktop (Figure 3).   It turned out that Edge didn't completely exit after closing.  And Edge got auto-updated while I had it open.  

Figure 3.  Quick Access Search Bar by Microsoft Edge


As my response, I clicked "Turn off search bar" (Figure 3).  Then I reopened the Edge and disabled Edge continuously running in the background after it had been closed (Figure 4).  

Figure 4.  Disable Microsoft Edge Running in the Background after Closing

Unfortunately, this Quick Access Search Bar was still triggered by Windows search regardless of my  default browser.  If there was Quick Access Search Bar, there would be Microsoft Edge always running in the background.  A registry trick is required to fix this.
  • Open Registry Editor (regedit.exe)
  • Add a 32-bit DWORD key named "WebWidgetAllowed" in the location of   "Computer\HKEY_LOCAL_MACHINE\SOFTWARE\Policies\Microsoft\Edge"

    By default Edge key doesn't exist. Simply right-click on the folder and choose New > Key and then type Edge to create it.

    Inside the Edge folder, choose New > DWORD (32-bit) Value, and then type WebWidgetAllowed and set its value to 0.

Edge is a Chromium-based browser.  Thus, it behaves like Chrome.  It will always update automatically (Figure 5).  To prevent this from happening, I added the following URLs into my Pi-hole blacklist (Figure 6).
  • msedge.api.cdp.microsoft.com   (endpoint for Edge to check updates)
  • *.dl.delivery.mp.microsoft.com   (services endpoints for download, also for windows update).
    Note that this item must be enabled for windows update.  Otherwise, windows update may get stuck.

    Figure 5.  Microsoft Edge is Always Auto-Update Like Chrome


    Figure 6.  Microsoft Edge is No Longer to Update after Pi-hole Intervention


Since then, I haven't seen any unwanted popups.  Hope that they are really gone forever.  Otherwise, I will consider completely to uninstall Microsoft Edge.

Here are the steps to remove Microsoft Edge via the command prompt when  the "uninstall" button is grayed out on Windows 10.
  • First, let's find out where the Edge's installer is via File Explorer (C:\Program Files (x86)\Microsoft\Edge\Application)

    Figure 7.  Navigate to Microsoft Edge Installation Folder 

  • Go into the matching version folder.  In this case of the example, C:\Program Files (x86)\Microsoft\Edge\Application\116.0.1938.62\.

    Figure 8.  Location of Microsoft Edge Installer

  • Open the command prompt: at the location bar, type cmd or cmd.exe.  Or type the "cmd" in the  Windows search box.

  • Commands for Edge uninstallation:

    • In the command prompt, be sure you are in the setup.exe location (e.g., C:\Program Files (x86)\Microsoft\Edge\Application\116.0.1938.62\); otherwise, do

      cd C:\Program Files (x86)\Microsoft\Edge\Application\116.0.1938.62\

    • setup.exe --uninstall --system-level --verbose-logging --force-uninstall

Thursday, August 24, 2023

Fixing Scrolling & Clickable Issues on Chrome

Go to solutions

Some (discussion) Webpages (e.g., nextcloud, pi-hole) work fine at the first visit (Figure 1) when there is no cookie in place.  In the subsequent visits or refresh, the pages immediately become unscrollable (Figure 2) and all buttons and links are not functioning.  This situation has nothing related to the right-click being controlled.  These scrolling & clickable issues on Chrome are most likely in conflict with one or more installed Chrome extensions.

For example, if Auto Quality for YouTube extension is installed, the following pages won't be able to scroll after the first or initial visit of the Website.  Buttons or links are also unclickable.  In this case, the pages have no scrollbar and the internal scrollbar is also disabled if it exists (Figure 2).  

https://help.nextcloud.com/t/ai-in-nextcloud-what-why-and-how/166916

https://discourse.pi-hole.net/c/feature-requests/

https://discourse.pi-hole.net/t/filter-querylog-toplist-by-query-response-nxdomain/62914 

Figure 1.  Normal View at First Visit

Figure 2.  Non-scrollable after refreshscrolling and clickable issues

Figure 3.  Clear the Specific Site's CookieDelete the site cookie

Deleting the specific site cookie (Figure 3) will fix these issues once, but they will resume shortly after a simple refresh.  Apparently, clearing the site cookie is NOT a solution.

I also found that Websites using similar UI layout on Chrome may suffer the same issues.  Of course, there are some exceptions  The following two are one of the exceptions.

https://community.volumio.com/

https://community.octoprint.org/

It looks to me that these issues are somewhat related to caching and cookies.  Regardless of what causes it, here are some solutions that work for me.

Solutions

In my case, there are three (3) solutions.  I personally prefer the first or the second solution depending on my needs.

1. Hard Refresh

It is a simple solution without tempering anything.  Simply do a hard reload on the page should do the trick.

  • With mouse, do Shift-Click. 
  • With keyboard, do Ctrl-Shift-R.
    Hard Reload
2. Cookie Control

Disabling the site to store cookies will cause Service Worker registration to fail and no longer to work with cache.  This approach may cause errors if the site heavily relies on cookies.  Fortunately, it has been working fine for me so far.

  • Go to chrome://settings/content/siteData, and then
    scroll down to "Not allowed to save data on your device" section.

    Go to Chrome site data page

  • Click "Add" button to add the site

    Add the site into disallow to place cookies

  • As soon as the entry is added, simply refresh the page of the Website to see the effect.

    After having added an entry, refresh the page to see the effect
Also see how to allow or block cookies for a specific site on Google Chrome Help for details if needed.

3.  Temporarily off or Disable Extension

If one or more extension are installed with Chrome in conflict with the Webpage, it will be time consuming to find it out manually.  Uninstalling the extension is a long-term solution if the extension is no longer needed.  Most of time, it is not the case.  Then consider temporarily to disable it.

  • Go to chrome://extensions/
  • Slide on or off the extension to enable or disable it

    Enable or disable the extension from chrome

Hope that one the above solutions may work for you.  I would also like to hear from you if you have alternatives to resolve this.

Monday, March 27, 2023

Forcing Blogger to Display Your Favorite Language

Blogger was acquired by Google in February 2003.  Like Google, it always uses IP address to identify viewers' geographical locations for language display.  It doesn't offer language selection for viewers.  If you own a blog under blogger and have already logged in, you will be able to control the language display via the blogger settings.  For others, they could see foreign language as per their IP locations.  In order to force blogger to display your favorite language,  you can simply append a query string (a key-value pair) to the end of  URL along with a question mark (?) prefix .  This method applies to Blogger URL without parameters.  Otherwise, replace the question mark (?) prefix with an ampersand (&).

This technique also applies to Google Search and most Google related products.

No URL Parameter
(Blogger URL usally doesn't have query string)
Sample LanguagesAdd Query String Portion
including question mark (?)
English (United States)?hl=en
French (France) - ‪français (France)?hl=fr
German - ‪Deutsch?hl=de
Chinese (Hong Kong) - ‪中文(香港)?hl=zh-HK
Japanese - ‪日本語?hl=ja
e.g., https://www.blogger.com/profile/08199735935642753756?hl=en


When URL Parameter Exists,
use ampersand (&) instead of question mark (?)
Sample LanguagesAppend Additional URL Parameter
English (United States)&hl=en
French (France) - ‪français (France)&hl=fr
German - ‪Deutsch&hl=de
Chinese (Hong Kong) - ‪中文(香港)&hl=zh-HK
Japanese - ‪日本語&hl=ja


Wednesday, March 8, 2023

Mega Account Recovery

While attempting to sign up a 20GBs free storage account with Mega (mega.io or mega.nz), I found that I had previously created an account with them.   However, I could not recall my password and was unable to find an account recovery option..  Instead, Mega offered me the option of creating a new account with the same email address, while deleting all files from the previous account.  They assured me that the files would be retained for 60 days in case I recalled my password and required further assistance from their support team.

In my situation, creating a new account and deleting the existing files is not an issue.  However, I can understand that some users may prefer to use a different email address for a new account.  While I personally find this process convenient, I can empathize with those who may find it difficult to part with their important files.

 Let's review their so-called account recovery by losing existing files if any.  At the end, I will also point out a few things about Mega for your reference.


Go to Mega login page and then click "Forgot your password?" which will forward you to the account recovery page.


Or directly go to the recovery page via this URL  https://mega.nz/recovery,  Then enter your password to proceed.


Before Mega create a new account for you, they would try and help you to recover your account in destructive ways as possible.  

The first one is the recovery key to see if you may happen to have it.  


The second one is to check  if you may still have an active session with Mega such as browser session or app session.  Check all boxes if you confirm there isn't one and then click the NO option to continue.


Then Mega will warn you about the potential risk of this recovery which will lose all your existing files.  However, they also inform you that you will have 60 days to recover your files if you happen to recall your password at a later time.

Finally, you will receive a password link via your email account for account creation if you still insist.  


Use the provided link from your email account for further setup.  Then Mega will give you a final warning. 


As you proceed with "Start new account", you will be presented a new account for access.  That's.


Technically I believe Mega has a way to reset your password and then recover your existing account without losing files.  Otherwise, how could Mega firmly retain your files for 60 days?  It looks to me that they are able to know which files are associated with your existing account.  Since no account recovery is one of their policies to begin with, they follow the rule by kindly setting you up a new one instead.


Mega seems to encourage you to do more link sharing with friends and others so that you may indirectly introduce new users to them and then in turn earn commission.   However it is not as simple as it said when you look into their fine texts.  You and your referred users at least make one purchase with them.  See the details.


For safety, Mega will prompt you to export your recovery key or retest your password to ensure that you can log back in later whenever you attempt to log out.  Of course, if you don't want this reminder,  you can turned it off by checking the box of "Do not show again" in the bottom of this popup below.


In addition, Mega will impose transfer/download speed limit on files based on your IP usages in the past six hours to prevent their network from being overloaded, especially it is a free account.  I believe that not many people like this restriction but a lot storage accounts do the similar throttle to control the network traffic.  You can read this to find out more about Mega's traffic throttle.


So far I've only highlighted a few policies that you should be aware when you sign up an account with Mega.  To learn more, please go to Mega and explore yourself.

pCloud only 3 to 4GBs free storage by default

I only used pCloud for its free big file transfer because it can send a file up to 5GBs and doesn't require registration.  pCloud transfer is also stable and fast. And there is no speed limit control for download.  Today I would like to get more free storage so that I can transfer a file beyond 5GBs.  Since pCloud advertised 10GBs free storage, I decided to sign it up.   It turns out that these 10GBs free come with strings attached.  By default, only 3 or 4 GBs are free.


After having signed up with pCloud,  I was asked for email verification to complete the process so that I could have 3GBs free storage.  


To get more free storage up to 10GBs, the following conditions must be fulfilled.  I'm personally not much interested to get them all.  Instead, I feel to be fooled to sign up.  

The first step is to upload a file to pCloud and it is easy.  


After this step, I have 4GBs free.  That's.  I am unwilling to do the rest.   My purpose to sign up is to send a big file larger than 5GBs.   Now my current free storage is 4GBs even less than the free 5GBs without registration. 


Anyway I will continue to show you the rest of the screenshots of what pCloud ask for so that you get an idea and decide if it is worth to sign up. 

The following are the screens after a file has been uploaded.

Download pCloud Drive onto your PC - add you 1 GB

Install pCloud onto your Android or IOS device - add you 1 GB

Turn on sync for your photo and videos upload from your mobile device - add you 1 GB

Invite 3friends -  - add you 3 GB


To me, it is not worth to go through this by being a freeloader!

Actions / ConditionsGetTotal
Sign up pCloud account successfully with email verified (default free GBs)3 GBs3 GBs
Upload a file successfully to your pCloud account1 GB4 GBs
Download, install and use pCloud on PC1 GB5GBs
Install pCloud onto your mobile device (Android or IOS)1 GB6GBs
Enable auto-upload photos and videos from your mobile devices1 GB7 GBs
Invite 3 friends (each one brings you 1GB)3 GB10 GB

Thursday, March 2, 2023

Review Sav.com and How to Log in their New Help Center

The following is my brief review on Sav.com (near the bottom) and show you how to get onto their new Help Center for request ticket submission.

Issue with Sav Help Center

Sav is migrating their support system to Zendesk.  As an existing customer, I got confused how to submit a ticket for help.  If you are running into the same issue, the following may assist you.

The new Help Center of Sav setup on Zendesk currently is outside your Sav account.  Your Sav credential won't be auto-forwarded to Zendesk.  You need to set up a new Help account on Zendesk before use. The login between Sav and Zendesk are completely separate and independent.  Unlike the past, logging onto Sav doesn't mean you are also on their help system.  Currently you must log in separately for Sav account and Zendesk help system.

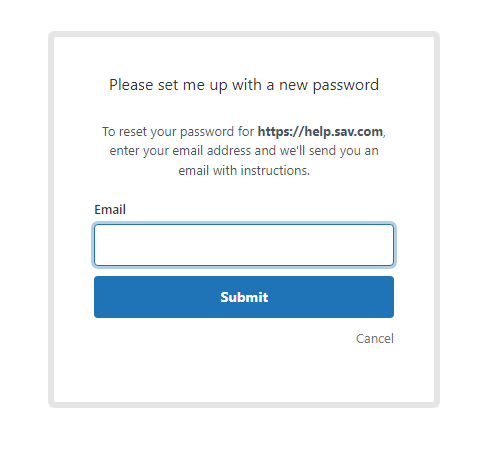
As usual, you can proceed to https://help.sav.com/ for help.  If you are an existing Sav customer and it is your first time to use their Zendesk help system, you may encounter the following error after you've provided your Sav credential.  I guess, for security or technical reason, Sav don't migrate your password into Zendesk but your login email.  Thus, you need to set it up yourself.  Unfortunately, the login screen is quite confusing.

Email address / password combination is incorrect, try again

How to submit a ticket (existing customers)

  1. On https://help.sav.com/, click "Sign in" link on the right top of the page.

  2. You will be forwarded to Zendesk for login whether or not you've already logged in onto Sav account.

  3. Click "Get a password" link.
    Sav do not directly publish their support email address.  It could be difficult for you to contact them for help when you get stuck the login.  
  4. Enter your Sav login email in the Email box and then hit "Submit.
  5. Check your mailbox.  Zendesk should send you a password link for password creation for your help account setup.
  6. Follow the link found in your mailbox to create your password on Zendesk.  The password could be completely different from your Sav account.
  7. After this step, you should be able to log in Sav Help Center on Zendesk to submit a ticket.

  8. Scroll down the help page or search for "Submit a request." 

  9. Click on "Submit a request" to post your help request.


About Sav

Sav is one of domain registrars.  They offer all-inclusive budget pricing for all cases such as first-time registration, transfer and renewal.  Most importance is that their prices for all TLD domains excepts for .us include free WHOIS privacy protection.  

You may find a good deal by transferring your domain(s) to another registrar for the first year but you may be ripped off in the subsequent renewals.  Unlike most registrars, Sav publishes their price sheet at a glance including the current prices of renewal.

Previously, I used 1&1 which also included free privacy protection.  Since 1&1 was merged with ProfitBricks and later rebranded to IONOS, their renewal pricing are getting expensive.  IONOS also no longer offer toll free number 1-800 in the USA.  Thus, I've gradually moved around my domains from one to another until I use Sav.

Although Sav has the lowest pricing, their support is not available 24/7, and it also intensively relies on their online Help System.  As per my past experience, their support hours are limited within office hours while IONOS (or previously 1&1) do provide 24/7 support via multiple channels.  I am not sure if Sav will have a better support after having moved onto Zendesk.  As of this writing, Sav only provide help/technical support during office hours.

The user interfaces on IONOS are quite clear to guide you every single step.  With Sav, you are on your own and possibly read their online documentation available from their help system.

One more thing, I am not sure when this policy began that Sav now won't allow their customers personally to remove their previous setup payment method.  It means that there will be two or more entries if you switch one card to another.  For security reason, you may want to remove the ones you don't want to use. In this case, you have to submit a request for removal.  It is very inconvenient and I personally don't feel comfortable either.

For any reason, if you still want to get ahold with Sav via email, you can, please see below.  However, if you want further assisting your Sav account, using their online "Submit a request" via their Help System (currently on Zendesk) is required.

Sav Email Contact support@sav.com.


Wednesday, February 22, 2023

Just renew magicJack for another 5 years

It's time for renewal.   Today I received a 5-year promotion plan offer from email notifications.  This good deal is only for renewal and used once only.  The total charge for 5-year (plan renewal) is $150 order + $13.50 admin = $163.50 plus tax if any.  This exclusive offer is not present on the magicJack homepage.

My experience with magicJack

I have been using magicJack since 2009, and I am happy about it.   My magicJack device over a decade is still working.   A few years ago, magicJack even made its mobile apps available without additional charges.  The app won't require the magicJack device plugging into a computer as long as the Internet connection is available.  It is a very good feature on-the-go without carrying around the magicJack device.  The bad of the app is that it keeps popping up the new feature alert (such as using Bluetooth for communication) when the new feature cannot be auto-enabled due to phone settings.  I hope that this can be improved sometime soon.  

magicJack app can run on a very old android device with at least Android 4.4.  But for Apple devices, it requires at least IOS 13.  It means your devices must be quite modern. 


Sunday, January 15, 2023

ExpressZip and Restoring Extract All Option

You may suddenly notice "Extract All..." option is missing  in return for "Extract with Express Zip" when you right-click on a ZIP file on a Windows system. 

ExpressZip is one of products by NCH Software.  It usually comes with any NCH Software product, e.g., video or audio software.   Your system may not have any installation content or trace of ExpressZip including the registry entries.  However, there is usually a registry entry associated with "Extract with Express Zip" command, typically inside a user profile subkey of the HKEY_USERS hive.  Surprisingly the open command for "Extract with Express Zip" is set to using 7-zip command if you have 7-zip installed.

If you are using any product(s) by NCH Software, uninstalling them will usually restore "Extract All..." option but a reboot is required.  Or you may try and go to NCH Software to install ExpressZip, and then uninstall it.


Saturday, January 14, 2023

Remove Alibaba PC Safe Service

If you has found the uninvited resident called Alibaba PC Safe Service under your Windows system but you cannot kick it out, the following information may assist you.  

This service is officially identified as AlibabaProtectAlibaba PC Safe Service is just the name description.  It is typically installed in the C:\Program Files (x86) directory.   

This service appears to be inexorable.  You cannot terminate it directly through the Services application (services.msc), nor can you end it via Task Manager or the "taskkill /f" command.  It does not appear in the "Add or remove programs" section (appwiz.cpl) either.   Although there may be an uninstaller (an EXE file) under the installation folder (i.e., C:\Program Files (x86)\AlibabaProtect), this EXE always refuses to run.  There appears to be no way to stop its running, much less to remove it entirely.

This article outlines how AlibabaProtect infiltrates your system and offers a viable solution for removal without the need of third-party tools or additional software.


How or why will AlibabaProtect be installed?

Most likely your system have AliWangWang installed.  As of this writing, AliWangWang is the only online messenger for chatting with China online marketers on Taobao if you are using Taobao Web version (on a PC or laptop). 

You may be able to bypass AlibabaProtect when you first install AliWangWang.  Unfortunately, AlibabaProtect still finds its way to enter your system without your notice when you do subsequent update/upgrade AliWangWang.

With AlibabaProtect, most people will immediately notice the slowness on the system.


How to remove AlibabaProtect without additional app installed?

Before you start, you must have administrator rights to do the following.

  1. Open a command prompt with admin rights

  2. Type   takeown /f  "C:\Program Files (x86)\AlibabaProtect" /r /d y  
    Be sure this command runs successfully. If not, sorry you need to seek help from somewhere else.

  3. Type   sc delete AlibabaProtect  
    Be sure this command runs successfully. If not, sorry you need to seek help from somewhere else.

  4. Reboot your system.  If you don't want to reboot, it will be worth a try of either one option below.

    Option 1: End task via Task Manager to kill or stop "Alibaba PC Safe Service"
    or 
    Option 2: In a command prompt with admin rights, do the following:

               sc queryex AlibabaProtect  to find out the PID number, then
               taskkill /pid <pid number> /f  (e.g.,  taskkill /pid 11192 /f )

    If both methods fail or getting  "Access Denied" error, the only one solution is to reboot your system before going onto the next step.

  5. Up to here, you should be able to remove all files and directories of AlibabaProtect
    Type    rmdir /s /q "C:\Program Files (x86)\AlibabaProtect"  in the command prompt with admin rights.
That's all.  Hope the above removal steps may help.  Good luck.


Sunday, October 30, 2022

Green Screen on Samsung Galaxy Note 10+


Samsung Galaxy Green Screen looks like a hardware glitch.

How can you log in while the phone is non-responsive due to the green screen sitting on-top?  Use a flashlight directly to shine the front camera (the one used for selfie).  Then the green screen will gradually go away, and you should be able to go into the phone for data backup before further fixing it.
 

Saturday, May 14, 2022

S Pen keeps disconnecting

Android Phone: Samsung Galaxy Note 10+
Android version: 12

After phone update, S Pen of my phone keeps disconnecting and sending annoying notifications for reconnect, especially when I put my phone to charge.  The culprit is the Air actions of S Pen.  I did the following to disable it and everything is back to normal.  I what causes this.  Air

  • Navigate to Settings | Advanced features | S Pen 
  • Turn off Air actions 
  • Restart the phone to take effect
Like Windows 10, whenever there is an update, there may be issues awaiting for you!

Tuesday, May 3, 2022

Beware! Google Photos app will delete your photos from your devices even with Back up & Sync disabled

A few friends of mine keep complaining losing their precious photos with Google Photos.  I am using Google Photos almost 5 years, but I have never encountered such an issue.  I always use the Web version of Google Photos for photo management, not the app.  The Web version is accessible via a browser while the app version must be installed before use regardless of on a phone or a desktop. 

To understand the deletion issue, I've recently taken Google Photos on my test run.  How and when are photos on a phone being deleted by Google Photos?  Is there a safe way to manage deletions on Google Photos?  The tests were manually done (1) on an android phone and (2) via the browser accessible to both desktop and phone with a single account.  

My current version of Google Photos app for test is 5.87.0444573954.

What I found is that the culprits of losing photos during deletion is using Google Photos app.  Unlike the Web version, the app always ensure the synchronized (or uploaded) photos deleted from the device(s), despite the option of "Back up & sync" disabled.  The only way to remove photos from Google Photos without removing from the device(s) is to have the "Back up & sync" option disabled first and then use the Web version for deletion.
  • Whenever you delete a photo from a device via Google Photos app, the photo associated with Google Photos will be removed at the same time if the photo was uploaded and added into Google Photos before.  In this case, the app will always delete it from the device and Google Photos, despite the option of "Back up & sync" disabled.  
  • Google Photos app provides an option for you to delete a photo from the device without removing from Google Photos. 


    There is no option for the other way around even though "Back up & sync" option is disabled.  In other words, the synchronized photo must be deleted from both the device and Google Photos.  Before deletion, Google has already provided a warning message (such as Remove from Google account & synced devices?)

    Google Photos Deletion Messagge

  • The only way to remove a photos safely from Google Photos is using the Web version of Google Photos (via Web browser) along with the "Back up & sync" option off.
I am not sure if Google does this on purpose or if it is a bug.   From the deletion message, it may be done by design.  It could be the reason why this issue has existed for a long time. 

In addition, my impression of using Google Photos app is actually handing over full control to Google (i.e., the Google Photos app), and your photos with Google Photos become a main copy, not the ones in your device(s).  Thus, when you delete a photo from Google Photos, the app will ensure to remove them from your device(s) without providing you an option to keep them in your device(s).

If you would like to manipulate photos in Google Photos without affecting your copy in your device, disabled the "Back up & sync" of Google Photos app, and then use the browser to handle the photo deletion.

For me, photos with Google are primarily for sharing.  I do not want Google to manage them in my device(s).  Thus, I will always have "Back up & sync" disabled and continue to use the Web version.


Thursday, April 14, 2022

How to download Whatsapp Profile

The following procedure only works with the Web version.

1. View the user profile picture as usual
2. Right click to "Copy Image Address"
3. Decode the URL
4. Extract the value of "e" key
5. Remove all key-value pairs except for "oh" and "oe" these two keys pairs

The new version of Whatsapp (newer than v2.22.3.76) should be able to let you retrieve the URL directly (step 1 and 2) without  the rest of steps (step 3 to 5).

My current versions are v2.22.7.74 android and v2.22.6.74 iPhone respectively.


Friday, March 11, 2022

Fix Zoom White Screen in OBS

My current OBS Studio Version: 27.2.3 (64 bit)

Using OBS to capture or record Zoom meeting may result in a white screen if you're running it on Windows with the default "Auto" setting for Video Rendering Method.  In this case, the default graphics API used in Zoom for rendering is not suitable for your camera.  

White screen of Zoom meeting in OBS 

Changing the rendering method to either "Direct3D11 Flip Mode" or "Direct3D" should fix the issue.
  • For HD video, choose "Direct3D11 Flip Mode"
  • Otherwise, choose "Direct3D11

Navigate to Zoom Video Advanced Settings and Pay Attention to Camera Settings


What to select in Video Rendering Method

Firmware Update Failed on the 2nd Canon with Same SD

Recently I've done firmware update on my two old Canon EOS cameras using the same SD card, specifically, EOS 7D and EOS M3.  I did it to M3 first, then 7D.  But the update failed on 7D due to this error:  "Update file cannot be found.  Please check the memory card and reload the battery and try again."

File Not Found During Cannon Camera Firmware Update

There are two (2) ways to fix this.

  1. Reformat the SD card before copying the firmware file into it for firmware update if you don't mind losing all files.
  2. Simply remove or temporally save all  DCIM\CANONMSC\*.CTG file(s) in the SD card to someplace else before firmware update.

I did it with the second approach.  As soon as the camera detected the firmware file, the update went smoothly.